Example Notebook for Loading in Default pyBSM Parameters#
You can use this notebook to run an example image through a series of perturbations as defined by the parameters provided to the pybsm package. These parameters are loaded in according the what is in default config provided.
For broader context, pyBSM documentation provides foundational theory on image formation concepts.
Table of Contents#
To run this notebook in Colab, use the link below:
![]()
Set Up the Environment #
Note for Colab users: After setting up the environment, you may need to “Restart Runtime” in order to resolve package version conflicts (see the README for more info).
Note: We are suppressing warnings within this notebook to reduce visual clutter for demonstration purposes. If any issues arise while executing this notebook, we recommend that this cell is not executed so that any related warnings are shown.
import warnings

warnings.filterwarnings("ignore")
%pip install -qU pip
print("Installing nrtk...")
try:
    import pybsm  # noqa: F401 -- intentionally unused, just checking availability

    import nrtk  # noqa: F401 -- intentionally unused, just checking availability
except ImportError:
    %pip install -q "nrtk[pybsm]"
    pass  # jupytext converts %pip to a comment, so pass keeps the block valid
print("Installing headless OpenCV...")
%pip uninstall -qy opencv-python opencv-python-headless
%pip install -q opencv-python-headless
Note: you may need to restart the kernel to use updated packages.
Installing nrtk...
Installing headless OpenCV...
WARNING: Skipping opencv-python as it is not installed.
Note: you may need to restart the kernel to use updated packages.
Note: you may need to restart the kernel to use updated packages.
PyBSM Generator will be added once it is integrated the full pertubation pipeline functionality will be added
import os
import urllib.request

import matplotlib.pyplot as plt
import numpy as np
from PIL import Image

from nrtk.impls.perturb_image.optical.otf import load_default_config
Define Sensor and Scenario Parameters via Default Config #
These parameters describe the sensor that was used to capture the original image and scenario we are imaging in. See pyBSM documentation for general information on the meaning of these parameters and example UAV configuration for more details on how we reached the default UAV configuration.
# dirpath = os.path.dirname(os.path.abspath(__file__))
data_dir = "./data"
os.makedirs(data_dir, exist_ok=True)

url = "https://data.kitware.com/api/v1/item/6596fde89c30d6f4e17c9efc/download"

img_path = os.path.join(data_dir, "M-41 Walker Bulldog (USA) width 319cm height 272cm.tiff")

if not os.path.isfile(img_path):
    _ = urllib.request.urlretrieve(url, img_path)  # noqa: S310

img_file = "./data/M-41 Walker Bulldog (USA) width 319cm height 272cm.tiff"
image = np.asarray(Image.open(img_file))

###################################################
# Load in the default Blackfly parameters
sensor_and_scenario = load_default_config(preset="blackfly")
####################################################
Run PerturberMultivariateFactory Factory #
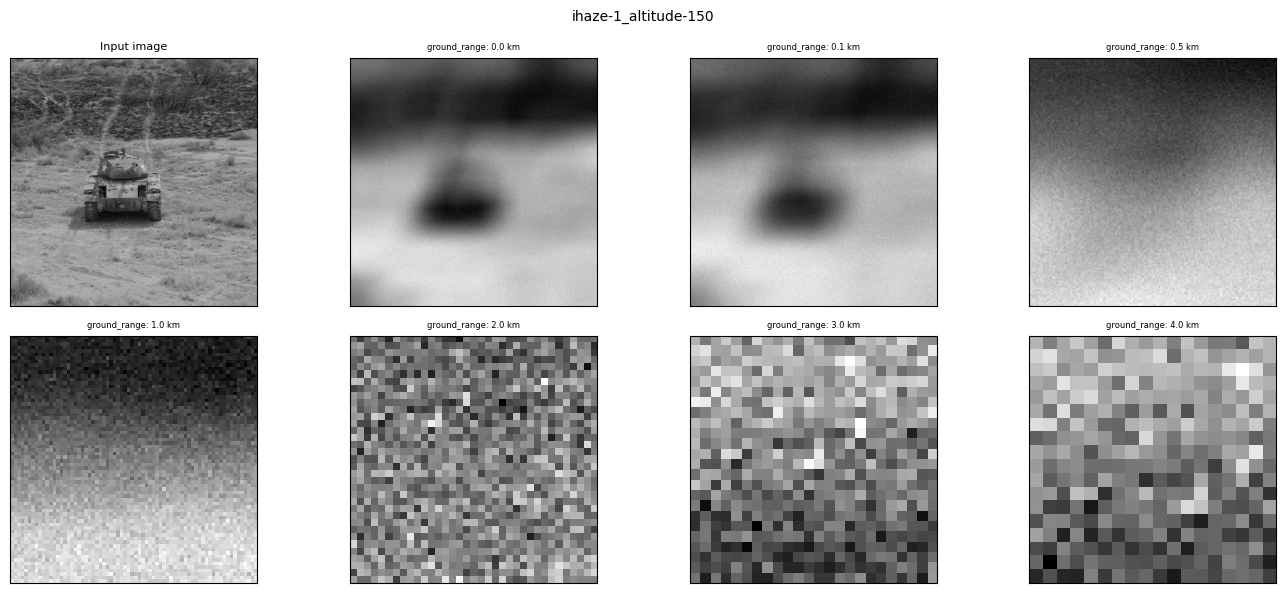
Finally, we use the sensor and scenario objects to create multiple pyBSM perturbers using PerturberMultivariateFactory. We iterate over 7 different ground_range values for the sample image.
from nrtk.impls.perturb_image.optical import PybsmPerturber
from nrtk.impls.perturb_image_factory import PerturberMultivariateFactory

# ground_range = np.arange(0, 101e3, 10e3)
# ground_range = np.arange(0, 10, 2)
ground_range = np.array([0, 0.1e3, 0.5e3, 1e3, 2e3, 3e3, 4e3])
img_gsd = 3.19 / 160.0
perturber_factory = PerturberMultivariateFactory(
    perturber=PybsmPerturber,
    theta_keys=["ground_range"],
    thetas=[ground_range],
    perturber_kwargs=sensor_and_scenario,
)
idx = 1
fig, ax = plt.subplots(2, 4, figsize=(14, 6))
fig.suptitle(
    "ihaze-" + str(sensor_and_scenario["ihaze"]) + "_altitude-" + str(sensor_and_scenario["altitude"]),
    fontsize=10,
)
ax = ax.flatten()  # makes indexing easier
ax[0].set_title("Input image", fontdict={"fontsize": 8})
ax[0].tick_params(left=False, right=False, labelleft=False, labelbottom=False, bottom=False)
ax[0].imshow(image, cmap="gray")
for ii in np.arange(0, ground_range.shape[0]):
    idx = ii + 1

    ax[idx].set_title(
        "ground_range: " + str(ground_range[ii] / 1000) + " km",
        fontdict={"fontsize": 6},
    )
    img_out, *_ = perturber_factory[ii](image=image, img_gsd=img_gsd)
    ax[idx].tick_params(left=False, right=False, labelleft=False, labelbottom=False, bottom=False)
    ax[idx].imshow(img_out, cmap="gray")
plt.tight_layout()
plt.show()