Apply Diffusion Perturbations with NRTK
This simple notebook demonstrates how to use Diffusion perturbers in an NRTK context, we use a sample image from the VisDrone dataset.
To run this notebook in Colab, use the link below:
![]()
Set Up the Environment
Note for Colab users: after setting up the environment, you may need to “Restart Runtime” in order to resolve package version conflicts (see the README for more info).
import warnings

warnings.filterwarnings("ignore")
import sys  # noqa: F401

!{sys.executable} -m pip install -qU pip
print("Installing nrtk...")
!{sys.executable} -m pip install -q nrtk[diffusion]
print("Installing matplotlib...")
!{sys.executable} -m pip install -q matplotlib
print("Installing headless OpenCV...")
!{sys.executable} -m pip uninstall -qy opencv-python opencv-python-headless  # make sure they're both gone.
!{sys.executable} -m pip install -q "numpy<2.0" opencv-python-headless
print("Done!")
Installing nrtk...
Installing matplotlib...
Installing headless OpenCV...
WARNING: Skipping opencv-python as it is not installed.
WARNING: Skipping opencv-python-headless as it is not installed.
Done!
%matplotlib inline
%config InlineBackend.figure_format = "jpeg"  # Use JPEG format for inline visualizations
import os
import urllib.request

import numpy as np
from matplotlib import pyplot as plt
from PIL import Image

from nrtk.impls.perturb_image.generic.diffusion_perturber import DiffusionPerturber

device = "cuda"
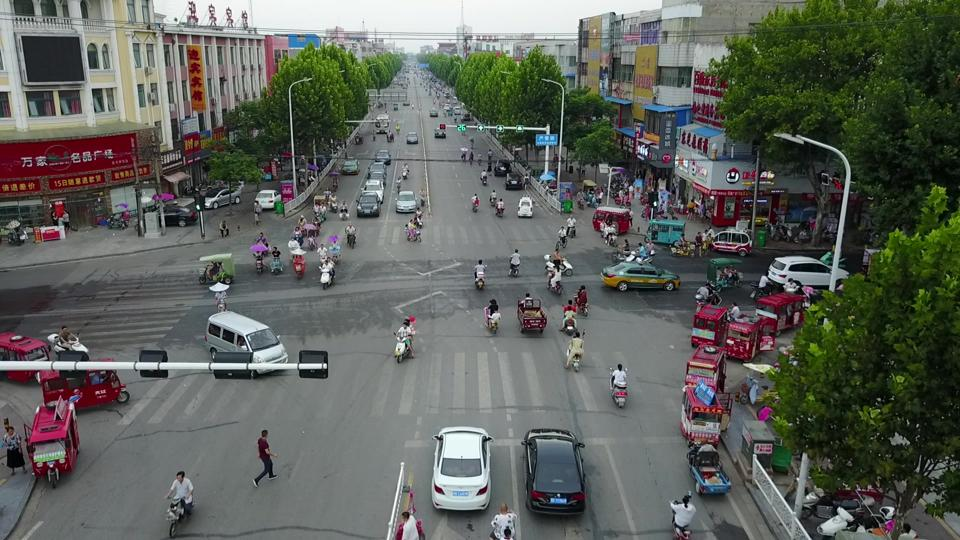
Select Initial Image
We’ll carry out perturbations on a single image from VisDrone
data_dir = "./data"
os.makedirs(data_dir, exist_ok=True)

url = "https://data.kitware.com/api/v1/item/623880f14acac99f429fe3ca/download"
img_path = os.path.join(data_dir, "visdrone_img.jpg")
if not os.path.isfile(img_path):
    print("Downloading image...")
    _ = urllib.request.urlretrieve(url, img_path)  # noqa: S310

# Load image with PIL
img_pil = Image.open(img_path)

img_pil
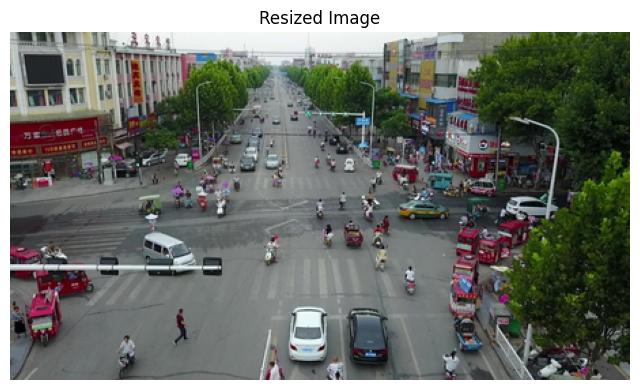
Resize Image
The diffusion perturber expects a resized image, so we will resize the image
def resize_image_for_diffusion(img_to_resize: Image.Image) -> Image.Image:
    """Resize image using the same logic as DiffusionPerturber._resize_image."""
    original_w, original_h = img_to_resize.size
    min_dimension = 256

    # Scale image down to the minimum dimension
    scale = min_dimension / min(original_w, original_h)
    new_w = int(original_w * scale)
    new_h = int(original_h * scale)

    # Round to the nearest multiple of 8 (required by the diffusion model)
    new_w = round(new_w / 8) * 8
    new_h = round(new_h / 8) * 8

    # Lanczos resampling improves image quality
    return img_to_resize.resize((new_w, new_h), Image.Resampling.LANCZOS)


# Resize the loaded image
img_pil_resized = resize_image_for_diffusion(img_pil)

print(f"Original image size: {img_pil.size}")
print(f"Resized image size: {img_pil_resized.size}")

img_resized_rgb = np.asarray(img_pil_resized)

# Display the resized image
plt.figure(figsize=(8, 8))
plt.axis("off")
plt.title("Resized Image")
_ = plt.imshow(img_resized_rgb)
plt.show()
Original image size: (960, 540)
Resized image size: (456, 256)
NRTK Diffusion Perturbation: Examples and Guidance
The DiffusionPerturber uses powerful, pre-trained diffusion models to apply complex, realistic perturbations based on text prompts. By default, it uses a model from the Instruct-Pix2Pix family, which excels at editing images based on text instructions.
The perturber is configured by the following key parameters:
prompt: A natural language description of the desired change. This is the most important parameter for controlling the visual output. Examples include “add heavy rain”, “make it look like a winter scene”, or “change the time to night”.model_name: The specific pre-trained model to use from the Hugging Face Hub. The default is"timbrooks/instruct-pix2pix".seed: An integer to ensure that the “random” aspects of the diffusion process are reproducible.num_inference_steps: The number of denoising steps in the diffusion process. Higher values can lead to higher quality results but increase computation time. Default is 50.text_guidance_scale: Controls how much the model’s output is influenced by the text prompt. Higher values mean the model adheres more strictly to the prompt. Default is 8.0.image_guidance_scale: Controls how much the model’s output preserves the structure of the original input image. Higher values mean more of the original image is retained. Default is 2.0.device: Specifies the computation device ("cuda"or"cpu"). Using"cuda"is strongly recommended for performance. If not specified, it will auto-detect a GPU but fall back to CPU if one is not available.
Important Notes for this Notebook:
Performance: Diffusion models are computationally intensive. The first time you use the perturber, it will download the model (which can be several gigabytes). Running on a CPU will be significantly slower than on a GPU.
Focus: For this notebook, we will primarily change the
promptto generate different visual effects. We will keep the other parameters at their default values to demonstrate the core functionality.Image Resizing: The input image is automatically resized to be compatible with the diffusion model’s expected input dimensions. This means the output image from the perturber will have different dimensions than the input image.
Generated Perturbed Image
This is a helper function that contains logic to generate an perturbed image and plot it.
def generate_perturbed_image(
    prompt_text: str,
    input_image: np.ndarray,
    seed: int = 42,
    device: str = "cuda",
) -> plt.Figure:
    """Generates a perturbed image based on a text prompt using DiffusionPerturber.

    Args:
        prompt_text (str): The text prompt to guide the perturbation.
        input_image (np.ndarray): The input image to be perturbed.
        seed (int): The random seed for reproducibility.
        device (str): The device to run the model on ('cuda' or 'cpu').

    Returns:
        plt.Figure: The matplotlib figure containing the perturbed image.
    """
    perturber = DiffusionPerturber(prompt=prompt_text, seed=seed, device=device)
    perturbed_img, _ = perturber(input_image)
    fig, ax = plt.subplots(figsize=(6, 6))
    ax.imshow(perturbed_img)
    ax.axis("off")
    ax.set_title(prompt_text)
    return fig
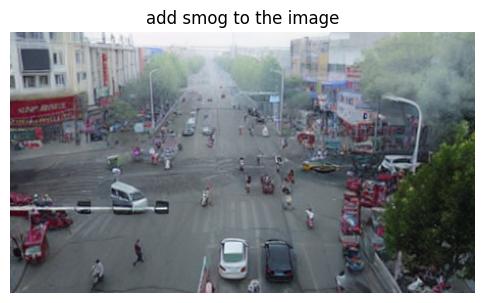
Add smog to the image
This prompt causes the diffusion model to add smog to the image
prompt = "add smog to the image"

img1 = generate_perturbed_image(prompt, img_resized_rgb)
Loading pipeline components...: 50%|█████ | 3/6 [00:00<00:00, 23.58it/s]
Loading pipeline components...: 100%|██████████| 6/6 [00:00<00:00, 14.36it/s]
100%|██████████| 50/50 [00:05<00:00,  9.02it/s]
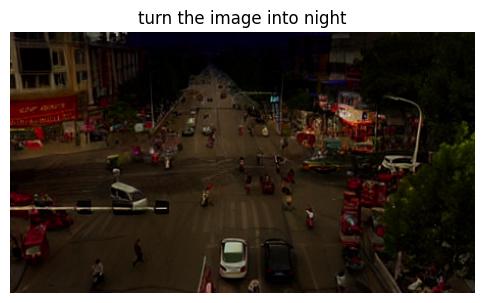
Turn the image into night
This prompt causes the diffusion model to take the daytime image and make it a night scene
prompt = "turn the image into night"

img2 = generate_perturbed_image(prompt, img_resized_rgb)
Loading pipeline components...: 0%| | 0/6 [00:00<?, ?it/s]
Loading pipeline components...: 100%|██████████| 6/6 [00:00<00:00, 24.36it/s]
100%|██████████| 50/50 [00:05<00:00,  9.00it/s]
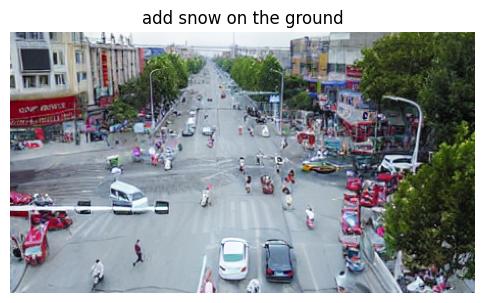
Add snow on the ground
This prompt causes the diffusion model to add a light layer of snow on the ground
prompt = "add snow on the ground"

img3 = generate_perturbed_image(prompt, img_resized_rgb)
Loading pipeline components...: 100%|██████████| 6/6 [00:00<00:00, 22.82it/s]
100%|██████████| 50/50 [00:05<00:00,  8.95it/s]